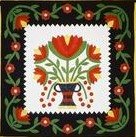
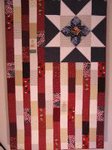
I have been derelict in updating my blog as I finished projects. I will try to correct this starting with this post and the others spread out over the next few weeks. This quilt was actually finished back in November. I gave it away to be used as a baby quilt. It measures 31.5 in X 34 in.
Friday, April 12, 2024
Friday, September 11, 2020
Quilt Damage Repaired
Our rescue Jack Russell terrier Harlow decided to chew on this old quilt for some unknown reason. We adopted her in March this year. She had not chewed on any of the quilts until recently when she did this.
I repaired it by trimming the hole and then hand sewing a piece of batting to fit. Then I machine stitched the words "Harlow was here" on a heart shaped piece of felted wool. I then machine quilted this over the hole. I then hand appliqued another heart using dog paw cotton fabric on the back.\
Here is a picture of Harlow (usually sweet).
Friday, December 29, 2017
Blocks for Thomas Fire Relief Quilts
Friday, October 6, 2017
Cross Shoulder Purse
The inside has three pockets, two open and one zips closed.
There is also a hook for keys on the end of the strap. I have always loved this feature in my old purse so added it here.
Friday, August 5, 2016
Sewing Room Remodel Done
Friday, October 16, 2015
Second Memory Quilt Top Finished
I used the pockets for this quilt.
Friday, October 9, 2015
Memory Quilt Finished
This photo shows some of the fabric detail.
This photo also shows some of the fabric detail as well as the tags/labels.
Here is a section of the back which shows some of the quilting detail.
Friday, September 4, 2015
Two Fabric Postcards
The second card features a cup cake with single lit candle.
Friday, June 12, 2015
Stars Galore
Friday, February 20, 2015
Works in Progress or Not
After finishing the body and the first sleeve I changed my mind. The fit no longer seemed good. The sweater body felt too boxy. The sleeve was way too wide. I decided to frog the project and use the yarn with a different pattern. I think I will use this one -- #14 Leaf Yoke Top by Angela Hahn.
This section has a tractor pulling a wagon full of apples, a robot, frogs, and a motorcycle.
Friday, July 4, 2014
My #OLFA35 Quilt Block
A few weeks ago I was contacted by an OLFA representative asking if I would like to participate in the 35th Anniversary Celebration this summer by either creating a square for their 35th Anniversary Commemorative Quilt which will be displayed this October at the International Quilt Market in Houston in October or by hosting a reader giveaway. I choose to create a square for the quilt. In return for participating I was sent a kit of OLFA products (a cutting board, a rotary cutter, a 6.5 in square ruler. There were only two rules for the quilt block: 1) it had to be 6.5 in square (will be 6 in square when sewn into the quilt) and 2) had to include the color yellow. Here's my #OLFA35 block.
Happy 4th of July! Hope you enjoy it safely. Here’s a link to one of my old post from 2011 on Firework Safety.
Friday, November 1, 2013
Fantasy Footwear -- Part Three
Let me refer you back to the these two previous posts (beginning, part 2) for the back story of this quilt. It took me a while to decide how I wanted to do the actual quilting. As you may notice in the photos below I made a few false starts with my marking. I'll have to be careful when doing the quilting to not take a wrong turn onto those false start marks. I finally settled on a circle around the shoe. Inside the circle will be hatch quilting in a horizontal direction. Outside the circle will be hatch quilting on a 45 degree angle. The shoe will be outline quilted. All of that will be done with white thread. Then I will most likely do some additional quilting on top of the larger green leaves and tulips, we'll see.
In this photo, you can see the freezer paper I used to sketch my quilt design (after I had made the earlier false starts). I marked the actual quilt using the freezer paper to get my outside square marked, then trimmed each corner from the circle and marked the circle.
And here is one corner marked. I don’t plan to mark the inner hatch marks until I have stitched around the shoe and stitched the circle plus another inner circle 1/4 inch from the original circle.
Friday, October 25, 2013
Fantasy Footwear -- Part Two
See the prior post for the back story on this quilt work-in-progress. After placing all the small pieces and fusing them into place it was time to do the detail stitching. These photos show some of the stitching. This first one shows the entire quilt top.
This one shows the heel of the shoe which I love.
Here is the butterfly which really came alive with the stitching added.
I really like how the daffodils came out.
The tulips may need a bit more work.
And here is the toe of the shoe with the bulb sitting on it
Now it's time to put the top, batting, and backing together and come to a decision regarding just how the actual quilting will be done.
Friday, November 16, 2012
Sandy Quilt Blocks
I cut off some of the black strip in this photo but it is as wide on all sides.
Friday, August 17, 2012
Two WIPs
This one shows a cat peeking out, a razorback, Tigger, a steamboat, stars.
And in this one you can see the owl in the connecting 2.5 in square, a dancing cat in a hat, a race car, carolers, trees.
The other is an ambitious knitting project. I’m making a swirl jacket using the pattern Sheer Beauty by Sandra McIver.
Here I've stretched out the knitting so you can see the two yarns: Noro Taiyo (color #28) and Malabrigo Lace in Damask (#13o).
Friday, January 20, 2012
WIP -- African Whole Cloth Quilt

 I then made a quilt sandwich of the quilt front, cotton batting (Hobbs), and the quilt back (which is a lovely green though the below photo has washed it out). I am now in the process of machine quilting the piece. I’m using outline or echo quilting.


